Posts

Showing posts from April, 2020

Pray Without Ceasing: Blueberry Lettering

Image
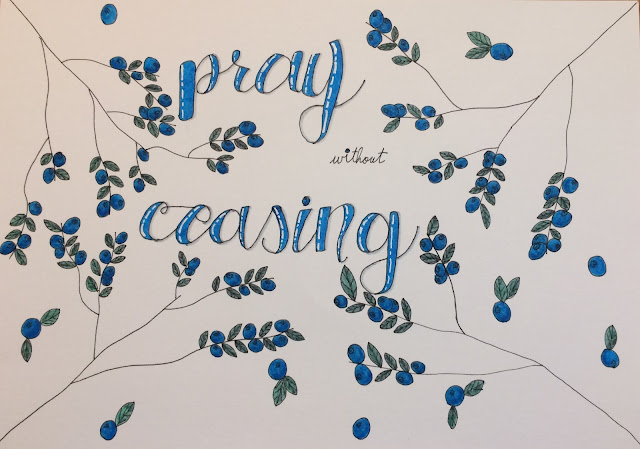
You will be relieved to know, that this project is very simple, and very pretty. Start (as usual) with choosing a font; look closely at mine, where there would be shadows I have put a black line then a thicker grey line. Fill in the letters: white out is optional, but the white lines that you see on mine are a white out pen; I think it adds more pop. Then, choose where you want your branches to be positioned , I have one coming from each corner. Next, add leaves and blueberries; make sure to RANDOMLY distribute them, and I added a few floating berries and leaves in some spots. Oh, and also make sure to shade the blueberries a bit, it really makes them look almost real! Thanks for reading! And stay tuned, because my next post will be a time lapse tutorial!

April Bullet Journal

Image
Welcome April! When Spring first starts to make an entrance. I always think of bees and flowers, hence this bullet journal design! This is a super simple idea...even my 7 year old sister made a copy! I always enjoy seeing the little differences she adds in her art, the little differences that express personality. My art is always the same :)...the same fonts, the same colors. I urge you now, try something new! So, to start this project, begin with the honeycomb background, I tried watercolour honeycomb and solid colors, both looked great! So, make your choice of honeycomb style, then pick a font to put "April" overtop the honeycomb. Mine was the classic font in black (obviously!). Next, we do the month cover, start with a square. Now, put the days of the week on the top of the square, then, you guessed it, fill in the numbers of the days of the month. Next, you can leave it like that, or you can add the decorations; flowers and bees. That's all for now!

Brush Lettering “If the Stars Were Made to Worship Then so Will I”

Image
This is a beautiful lettering that I used Arteza fineliners to create. The letters are Arteza fineliners and the border is washi tape by mgcity. Arteza is my FAVORITE brand! All of their stuff is super high quality and lasts if taken care of. Anyway... just start making this project by picking a font. You can find all sorts of fonts on Pinterest, the one I use is just the basic modern calligraphy alphabet. Once you’ve picked a font, outline your letters but do not fill them in yet. After you have the outline, decide if you want to fill them in with the fineliners or if you want to use markers, pens, etc. Then,  washi tape the edges! That simple! Thanks for reading!                 -Andi